Google forms have changed a few times since I started using them 4 years ago. As you look through my blog you will see different styles of forms and some different instructions from when I first began using them in 2014. So whether you are new to Google forms or in need of an update, it seems a good time to review how to create and implement the use of google forms.
Step 1: You must have a google account. It doesn't have to be a gmail account I recently learned. However, I personally like having a separate email account for all my google creations especially as it relates to school. Setting up this google account gives you access to all of the Google tools like slides, forms, docs, and sheets and allows you to collaborate with others on these Google products.
If you do not have a gmail, go to this link to set up a Google account. https://accounts.google.com/signupwithoutgmail
Step 2: Finding your tools. Go to your Google Drive. On the upper left side of the page click on the blue box that says NEW. You will get a drop down menu with the list of Google products. At the bottom of the list it says MORE click there and you will see Google Forms. Click on Google Forms to choose "Blank form" or "From a template."
Also consider how you want to be able to sort your data afterwards. If you want to be able to sort by last name or first name, that would be two separate questions rather than just asking the question, "What is is your name?" You would need a question for first name and one for last name if you want to sort by name. Also be careful about using ambiguous questions/statements or two questions posed as one. For example: I feel safe. Not very specific. Maybe they feel safe in some places and not in others. That makes me re-think how I should state this question. Also, the statement, "I feel safe at home and school" does not allow a student to specify if there is a difference. Instead ask two separate questions or make two separate statements, " I safe feel at home" and "I feel safe at school."
Google gives you the choice of responses. Your respondents can rate statements on a linear scale, complete long or short answers, use multiple choice, check boxes, drop down menus and more.
When previewing your form, if you decide you don't like the order of your questions, no problem. It is easy to grab the stack of 3 dots (referred to as "More") at the top of the page and move the questions around. This task is much easier to do on a laptop.
Step 4: Give your form a name and write a brief description of your form.
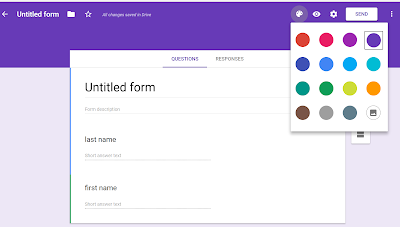
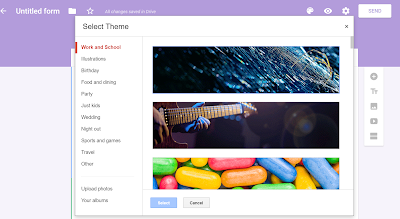
Step 5: Choose a background. Go to the top right of the page and look for the icon of the color palette. Click on that to see the drop down of color choices or go to the bottom right to the icon of a photograph to see the choices of headers Google has for your forms. If you are really "techie" or just adventurous, you can go the the bottom of the "Select Theme" list where you will find Upload photos. There you can make most any photo with the right dimensions (at least 800 pixels wide and 200 pixels tall) part of your background header.


Step 6: Sharing your form with others to complete. When you you are ready for your respondents to complete your form, go to the top right of your screen and click on the word SEND in the white box. This will open the SEND pop up box. You will see 3 icons for sending your form: by email, a link, or embedding it in a website. I like to use the middle icon, the link, to send the form to an email group or to create a QR code for my targeted audience to scan and complete my form.
Step 7: Reviewing your data. When you create a Google form, Google automatically collects your responses. At the top of your form you will see "QUESTIONS" and "RESPONSES." Next to "RESPONSES" you will see a number. That is the number of responses or entries to your form. To the right of that you will see a small green box with white lines. Click on that and it will say create a new spreadsheet or select an existing spread sheet. Click on create a new spread sheet and the blue CREATE. You will now have a response sheet by the same name as your form in your Google Drive. This is where all the data goes as each person completes your form and where you can go to view all your data and sort if you would like.
More to come!
In the next couple of weeks I will be talking about sharing Google forms in a QR code.
I love Google forms and the versatility of using them in my school counseling program. I would love to hear from other Google form users about how you use forms in your program. Please leave your comments and questions below as well as any tips or tricks you would like to share.


No comments:
Post a Comment